Continuing with my update on my GPS rocket navigation project, in this post I’ll quickly run thru my progress (or lack thereof) in latter half of 2010.
17 July 2010 – Flight #28 – First navigation attempt
Last year I posted a video of flight #28 of 17 July 2010, which was my very first flight with the GPS navigation software running and the steerable parachute.
As I mentioned in my recent post, that flight used a steering baseline of just 2.5 inches, yet the system appeared (from the ground) to be able to steer the parachute OK with that tiny baseline. Here’s the video (again):
As can be seen in the video, the rocket appeared to be steering purposefully, although not in the right direction. So I came away with the idea that (somewhat to my surprise) a tiny 2.5″ baseline was a workable thing.
Below, the red arrow shows the 2.5″ baseline – the distance from the left steering line (kevlar braid) to the right steering line.
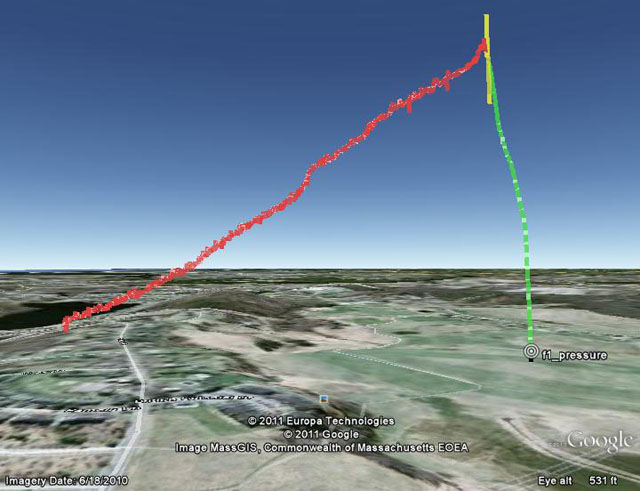
Here’s the plot of the flight path (click for the Google Earth KML file):
The navigation didn’t really work at all, but this was my very first attempt and I didn’t expect much; I knew there were a lot of variables in the navigation software that would need tweaking from flight experience. The winds aloft were much higher than expected and the rocket landed way off the field – 40 feet up in a pine tree. It took me 4 days to find it and get it down, but I’ll spare you that sob story.
One thing that came out of the flight was a determination to get the telemetry radio working – if I’d had that on this flight, I’d have had the GPS coordinates of the landing site, and it wouldn’t have taken days of searching to find the rocket.
18 September 2010 – Flights #29 and 30 – Test of piston ejection
The July 17 flight also had a problem with the ejection charge burning the steering control line to the parachute.
To avoid that happening again, I redesigned the rocket to use piston-type ejection, where the electronics bay is the piston. That way, instead of having the ejection charges on the parachute side of the electronics bay (where they can burn the control lines), the charges are on the opposite end of the electronics bay. The charge fires into the space between the altimeter bay and a fixed bulkhead in the body tube. The whole electronics bay slides out, pushing the parachute ahead of it.
Earlier in the year (April), I’d run some ground tests in my backyard to find out how big a BP charge was needed for piston ejection. I’d been using 3 to 4 grams of BP in conventional (non-piston) ejection in my 3″ and 4″ rockets. Here’s a video of the tests with the piston, in my 3″ rocket “Thrud”:
I started with 2.5 grams – I didn’t mean to build a cannon, but it seems I did. I ended up using just 0.5 grams of BP in the 3″ rocket (“Thrud”), and 750 mg in the 4″ rocket (“SuperHorizion”).
Two flights on 18 September tested the new system (without any attempt at navigation); it worked perfectly (and has continued to work great since). I’m sticking with piston ejection!
2 October 2010 – Flight #31 – Bad chute deployment
By October, I’d made a few software tweaks, had the piston ejection working smoothly, and was ready to try again with navigation. Here’s what happened:
The parachute lines were horribly tangled up, which prevented the parachute from inflating.
6 November 2010 – Flight #32 – Another crash
By the November launch I fixed the damage and was ready to try again:
Oof. Again, the parachute lines tangled in flight, resulting in a crash. This time there was no damage (just lucky).
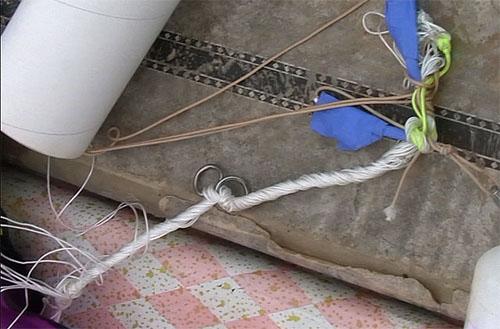
Here are a couple of stills from video, showing what the parachute lines looked like at recovery – all twisted and tangled:
6 November 2010 – Flight #33 – Some navigation! ?
Undeterred by the tangling/twisting problem, I packed the parachute and lines even more carefully and tried again.
Despite the taunts from my long-suffering fellow club members (they’ve seen a lot of my failures), the applause at landing was encouraging, even though I wasn’t sure at the time if the navigation was real or just good luck with the wind.
It was a low altitude flight – just 650 feet AGL on a Cesaroni H133 motor (a very small H), so the navigation system didn’t have a lot of descent time to learn to fly the parachute.
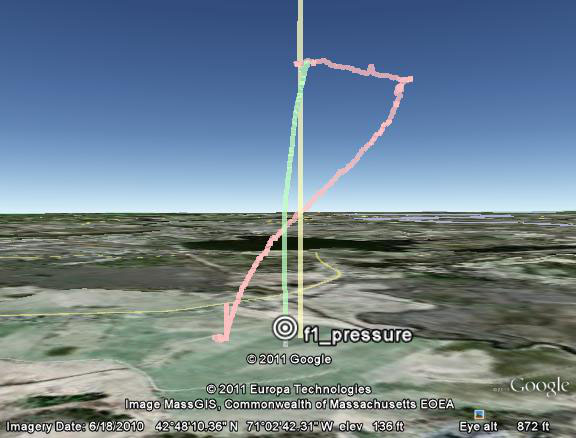
Here is the flight path as plotted in Googe Earth (again, click to download the KML file):
From the ground the parachute appeared to have deployed OK, but on recovery I found, again, tangled lines, but not as bad as in the previous flight. Have a look:
After the flight I had a careful look at the logged navigation data (including the internal state of the navigation algorithm) and decided that the rocket probably had navigated successfully for part of the flight – at least for a few seconds of the short descent. So this was a real milestone.
More importantly, I’d learned a lot. The tangling issue was clearly an ongoing problem, even with the most careful packing.
Looking at the video, I became concerned that another problem might be the swinging of the whole electronics bay (including the GPS) under the long parachute lines. Since the rocket estimates its flight direction based on sucessive GPS fixes, a significant swing could easily confuse the rocket into thinking it’s heading in the direction of the swing, instead of the direction of the parachute’s flight.
Club member Boris Katan – a much more experienced rocketeer – suggested that my parachute lines were much too long. I’d made them long to reduce the impact of the short baseline on the angle that the steering lines reached the parachute, but Boris convinced me to vastly shorten the lines – both to reduce the swing, and also to reduce the chance of tangling.
21 November 2010 – Flight #34 – Last launch of the 2010 season
The next launch on 21 November was the last of the year (here in Boston we get snow soon after that).
With much shorter lines to the parachute, I launched the 3″ “Thrud” rocket again, on an Aerotech H180:
That was bad.
In my earlier flights, I’d been using one of Robert DeHate’s PICO-AD4 altimeters as a backup to my own electronics for deployment. But I’d made some software changes to save battery power on the pad by powering down the servo until launch was detected. Inadvertently, that had also disabled power to the AD4 altimeter.
So as a quick “fix” to provide backup deployment in case the first flashbulb didn’t go, I’d wired two flashbulbs, with 0.5g of BP each, in parallel onto my own apogee ejection output. This was my half-baked ejection redundancy. It seems that 1g of BP going off at once was too much for the kevlar cord retaining the electronics bay/piston.
A lesson I learned late is to avoid using epoxy on Kevlar cords – I’d plugged the hole where the cord went thru a bulkhead with epoxy, but epoxy is stiff and doesn’t let the other fibers in the cord take up strain. So the Kevlar becomes brittle and weak – it ripped right at the end of the epoxy. (Hot glue is a much better solution; it’s flexible so it still allows the different fibers to take up the strain.)
The whole e-bay was ejected from the main body tube, together with the parachute and nose cone. The bottom plate of the e-bay (with the ejection charge holders and power switch) and the tube around it were ripped off (never found that). The wires running to the flashbulbs and power switch were ripped off at the PCB.
As you saw in the video, without the weight of the back end of the rocket, the parachute drifted a long way, bounced off a power line, and landed in the dreaded CMASS swamp.
The only good thing was that my PCB kept running, as it’s designed to turn off only when the power switch is closed (not open).
So that was it for the 2010 season.
I’d had one good flight of the system. That had worked only a little bit. But I got valuable data from the flight, which I was optimistic would enable me to tweak things so they work properly. The tangling problem was clearly serious, but I hoped that the shorter parachute lines and careful attention to packing of the parachute would address that in the new year.


