Archive for category Software

Half-baked copyright reform ideas & nanotechnology

In March 2008 I posted the below to the nsg-d mailing list, from which it was forwarded to a few other lists and engendered some discussion.

Seven years later, I think I have a solution to the problems I couldn’t solve then – it’s decentralized, voluntary, reasonably immune to spoofing and fraud, yet I think it’ll work.

I’ll leave you in suspense for a week or two until I write it up. For now, here is my 2008 post, with only very minor corrections:


from: Dave <dave@nerdfever.com>
to: Nanotechnology Study Group <nsg@marshome.org>
date: Fri, Mar 7, 2008 at 6:29 AM
subject: Half-baked copyright reform ideas & nanotechnology

Hi all,

I’ve been sitting on the ideas below for a little while.

I’ve decided to just post this half-baked, as it is. Maybe it’ll stimulate some better ideas from other people.

(The problem of copyright is particularly relevant to nanotechnology, if you think molecular assemblers are eventually going to be practical. Once you have assemblers, physical goods have very little value, and intellectual property becomes a relatively much larger component of the economy.)

Comments are welcome.

Premises

  • Creators need to get rewarded for creating things of value to others, somehow. Incentive is important.
  • Copyright today is not working very well. Consumers do not like DRM and find ways to circumvent it.

History

Zero

In the beginning, before the invention of the printing press, copyright was not an issue because there was no way to copy information in a way that was inexpensive enough to be economically viable.

Such information as was copied was transferred mainly by word-of-mouth. Since anyone could do this at any time, there was no practical way to regulate or charge for the distribution of information, even if someone had thought of doing so.

To the extent that payment was associated with information distribution, it was performance-based. Authors or readers might pay a scribe to make a copy, storytellers or entertainers might receive something in exchange for a performance, but there was no restriction on the retelling, copying, or further transfer of information other than that which could be achieved by simply keeping information secret.

One

After the invention of the printing press, copyright law was introduced (literally, the “right to copy”). It worked reasonably well because making copies was difficult. Making a copy of a book or a phonograph record required a lot of capital equipment and labor, and was economical only in large volumes.

Therefore the number of people who could make copies (practically speaking) was limited, and therefore fairly easy to police.

A certain amount of “fair use” was implied at this stage – people could loan and resell books and recordings without charge (in most countries), but the economics of reproduction technologies limited who could make copies.

Two

With the advent of Xerox machines, audio tape recorders, and VCRs, copying became easier and cheaper. In many cases an illicit copy could be made for less than the cost of purchasing a licensed copy from a copyright holder.

This is when the copyright system began to break down. Copies would be made for friends and passed around by hand. Still, the amount of damage to the copyright system was limited, because of the limited distribution abilities of those doing the copying, and because the copying itself still required some amount of capital and labor. A typical copier might make one or a few copies for friends and acquaintances, but still could not practically engage in mass distribution.

Three

The Internet changed all this. With universal connectivity and broadband capacity, individuals could distribute copied works easily and almost cost-free. Low-cost computers removed labor from the process. The traditional merits of the copyright system started failing in a serious way.

In some ways, the situation today is similar to that at “stage zero” before the invention of the printing press – anyone can copy and transfer to anyone else costlessly (as was true of word-of-mouth), and there is no practical way to regulate or control this.

The difference is that today large industries have formed to produce creative content, and society has benefited tremendously from this. These creators need to be paid (or otherwise rewarded), somehow. Yet the copyright system as we have known it seems increasingly unable to do the job.

Economics

The fundamental problem of the copyright system is the implication that a consumer must pay some fixed amount for a copy of a work, but the cost of reproducing the work is essentially zero. (I refer to the marginal cost to produce an additional copy; not the cost of creating the work in the first place.)

When a consumer places a positive value on having a copy, but that value is less than the price of the work, the consumer doesn’t buy it. This represents a dead loss to society (to the consumer). The amount of loss is the value of the work to the consumer, less the (nearly zero) reproduction cost of the work. [1]

Of course the same was true in the age of the printing press – if the value of a book to a reader was greater than the cost of printing, but less than the sales price, the reader didn’t buy and there was a loss to society of the difference between the value to the reader and the printing cost. But this loss was far less than the loss today on the Internet, because the cost of printing was a significant fraction of the price of the book – so relatively few readers found themselves valuing the book in the narrow range between printing cost and sales price.

On the Internet, the reproduction cost is approximately zero, so if a consumer places any non-zero value on a work there is a loss to society, unless that value is greater than the sales price.

If we could come up with a replacement for or reform of the copyright system that eliminated this loss, while still incenting creators to create, that would be an immense win for society.

Summary of the problem

In practical terms, copyright has become unenforceable. (DRM schemes don’t work – that is a topic for another essay.)

In economic terms, copyright is undesirable.

Yet there is a strong social benefit to be captured if, despite these facts, creators can somehow be paid (or otherwise rewarded) for creating useful or desirable works.

Requirements

Requirements for a new system to replace copyright:

  • Producers of valuable content must get paid, somehow
  • Consumers must be able to obtain and use copies of content at a marginal price to them that is at or near the marginal cost of reproduction. For almost all practical purposes, this means content needs to be free at the margin. (However this does not mean the non-marginal price needs to be zero.)
  • Producers of useless content must not get paid
    • Otherwise they will be taking resources they have not earned, or which should have gone to producers of valuable content
  • In order to preserve intellectual and cultural freedom, the determination of “value” must not be centralized, but must be a function of the opinions (expressed or implicit) of individual consumers.
    • The copyright system did an admirable job of this by using market mechanisms – valuable content sold for high prices and/or in large volumes. Less valuable content did not.

Assumptions:

  • As now, creators of joint works (works with multiple authors) agree among themselves the relative value of their contributions and the distribution of rewards for the joint work.
  • Any new system would apply only to public (not private or secret) information. These ideas do not address trade secret or patent law, only works which are offered to the public and currently controlled by copyright.

How could we go about achieving these goals?

[2015: The remainder is a list of half-baked ideas that I no longer support. I’m leaving it in only for completeness.]

Half-baked idea #1

Taxes are collected in the amount that now goes to all copyright creating industries (publishing, film, music, software, etc.). These taxes are levied without regard to consumption of content.

All content is placed online on special “distribution servers” and is freely downloadable.
Read the rest of this entry »
Flatten files in a folder hierarchy

Have you ever had a huge complicated folder tree with thousands of files buried layers deep in folders-within-folders?

And wanted to flatten them out so all the files are in a single folder, but without filename collisions (that is, lots of files with the same name)?

I did. The closest thing I could find off-the-shelf was this, so I wrote the Python script below.

I hope it’s helpful to someone.

To run it (assuming you have Python installed – you’ll need Python 3 in case some of your pathnames have Unicode characters), do this:

python flatten.py [root folder to be flattened] DOIT

If you leave off “DOIT” (all caps), then it will simulate what it’s going to do, without actually doing anything.

The way it works is by copying all the files to the root folder, renaming them with the original path to the file, but substituting “¦” for the “/” or “\” (Windows, Unix respectively).

So if you have (using the example from the link above) this inside “Folder0”:

Folder0 
          Folder1 
                    File1.1.txt 
                    File1.2.txt 
                    FolderA 
                              FileA.txt 
                    FolderB 
                              FileB.1.txt 
                              FileB.2.txt 
          Folder2 
                    FolderC 
                              FileC.txt

Then doing:

python flatten.py c:\path\to\Folder0 DOIT

Gets you these six files inside Folder0:

Folder1¦File1.1.txt
Folder1¦File1.2.txt
Folder1¦FolderA¦FileA.txt
Folder1¦FolderB¦FileB.1.txt
Folder1¦FolderB¦FileB.2.txt
Folder2¦FolderC¦FileC.txt

Enjoy, and if you make improvements, please post a comment here.

# -*- coding: utf-8 -*-
# for Python3 (needs Unicode)

import os, shutil, sys

def splitPath(p):
    """Returns a list of folder names in path to p

    From user1556435 at http://stackoverflow.com/questions/3167154/how-to-split-a-dos-path-into-its-components-in-python"""
    a,b = os.path.split(p)
    return (splitPath(a) if len(a) and len(b) else []) + [b]

def safeprint(s):
    """This is needed to prevent the Windows console (command line) from choking on Unicode characters in paths.
    
    From Giampaolo Rodolà at http://stackoverflow.com/questions/5419/python-unicode-and-the-windows-console"""
    try:
        print(s)
    except UnicodeEncodeError:
        if sys.version_info >= (3,):
            print(s.encode('utf8').decode(sys.stdout.encoding))
        else:
            print(s.encode('utf8'))

def flatten(root, doit):
    """Flattens a directory by moving all nested files up to the root and renaming uniquely based on the original path.

    Converts all occurances of "SEP" to "REPL" in names (this allows un-flatting later, but at the cost of the replacement).
    
    If doit is True, does action; otherwise just simulates.
    
    """
    
    SEP  = "¦"
    REPL = "?"

    folderCount = 0
    fileCount = 0

    if not doit:
        print("Simulating:")

    for path, dirs, files in os.walk(root, topdown=False):

        if path != root:

            for f in files:

                sp = splitPath(path)

                np = ""

                for element in sp[1:]:
                    e2 = element.replace(SEP, REPL)
                    np += e2 + SEP

                f2 = f.replace(SEP, REPL)
                newName = np + f2

                safeprint("Moved:   "+ newName )
                if doit:
                    shutil.move(os.path.join(path, f), os.path.join(root, newName))
                fileCount += 1

            safeprint("Removed: "+ path)
            if doit:
                os.rmdir(path)
            folderCount += 1

    if doit:
        print("Done.")        
    else:
        print("Simulation complete.")


    print("Moved files:", fileCount)
    print("Removed folders:", folderCount)

"""

if __name__ == "__main__":
    print("")

    print("Flatten v1.00 (c) 2014 Nerdfever.com")
    print("Use and modification permitted without limit; credit to NerdFever.com requested.")

    if len(sys.argv) < 2:
        print("Flattens all files in a path recursively, moving them all to the")
        print("root folder, renaming based on the path to the original folder.")
        print("Removes all now-empty subfolders of the given path.")
        print("")
        print("Syntax: flatten [path] [DOIT]")
        print("")
        print("The DOIT parameter makes flatten do the action; without it the action is only simualted.")
        print("Examples:")
        print("  flatten //machine/path/foo          Simulates flattening all contents of the given path")
        print("  flatten //machine/path/bar DOIT     Actually flattens given path")
    else:
        if len(sys.argv) == 3 and sys.argv[2] == "DOIT":
            flatten(sys.argv[1], True)
        else:
            flatten(sys.argv[1], False)

Numpy == goodness! (deinterlacing video in Numpy)

A few posts back I was trying to get Linux to record and play video at the same time.

I gave up on that, but got it working under Windows with Python; I’ll post the source for that here at some point.

A big part of the solution was OpenCV, PyGame and Numpy.

I’m hardly the first to say it, but I’m excited – Numpy is goodness!

My (stupid) video capture device grabs both interlaced fields of SDTV and composes them into a single frame. So instead of getting clean 720×240 at 60 Hz (sampling every other line, interlaced), you get 720×480 at 30 Hz with horrible herringbone interlace artifacts if there is any movement in the scene.

The artifacts were really annoying, so I found a way to get Numpy to copy all the even numbered lines on top of the odd numbered lines to get rid of the interlace artifacts:

img[1::2] = img[::2]

That’s it – one line of code. And it’s fast (machine speed)! My laptop does it easily in real time. And I learned enough to do it after just 20 minutes reading the Numpy tutorial.

Then, I decided I could do better – instead of just doubling the even lines, I could interpolate between them to produce the odd-numbered lines as the average of the even-numbered lines (above and below):

img[1:-1:2] = img[0:-2:2]/2 + img[2::2]/2

It works great! Numpy == goodness!


PS: Yes, I know I’m still throwing away half the information (the odd numbered lines); if you know a better way, please post a comment. Also, I’d like to record audio too, but OpenCV doesn’t seem to support that – if I get that working, I’ll post here.

CreepAway

Back in 1996 I had an idea I called the “CreepAway”.

It was a device that would screen your phone calls – it would auto-answer (blocking the local ring), and then ask the caller to “Enter Extension Number” (really a password).

If the caller entered the correct password, it would ring the phone so you can answer.

If they didn’t, the caller would be sent to voicemail.

The idea is that you give both your phone number and your “extension” to your friends – they dial your number, enter your “extension”, and the phone rings.

Telemarketers and others calling at random only get to leave a voicemail.

I think this would be easy to do today with an Android app.

I’m sick and tired of getting robocalls offering me legal help with my (non-existent) IRS debt.

Somebody please build this.


Update, 2013-12:

I recently realized that not only would this be easy to do in an Android or iOS app (intercept the incoming call at the API level, assuming those APIs are exposed), but there’s an even simpler way.

Do it as a service.

Your phone company (Vonage, Google Voice, the PTT, whatever) would provide you with two numbers – a public one (to be given out) and a private one (known only to the phone company).

When people call the public number, the service provider (phone company) would prompt for the extension (or password, whatever). If the caller gives the correct one, the call is forwarded to your private number. If not, to voicemail.

That’s it. It would be trivial to implement in a modern SIP or H.323 based phone system. And they could charge for the service.

Hey – somebody – DO THIS.

Play & record video at the same time in Linux

I didn’t think this would be so difficult.

All I want to do is play live video on my netbook (from /dev/video1:input=1:norm=NTSC) and record it at the same time. Without introducing lag.

mplayer plays the video fine (no noticeable lag).

mencoder records it fine.

The mplayer FAQ says you can do it this way:

mencoder tv:// -tv driver=v4l:width=324:height=248:outfmt=rgb24:device=/dev/video0:adevice=hw.1,0 -oac mp3lame -lameopts cbr:br=128 -flip -ovc lavc -lavcopts threads=2 -o >( tee filename.avi | mplayer -)

But that doesn’t work.

You can’t record and play at the same time because there is only one /dev/video1 device, and once either mencoder or mplayer is using it, the device is “busy” to any other program that wants to read the video stream.

I spent lots of time with mplayer, mencoder, ffmpeg, avconv, and vlc;  as far as I can tell none of them can do it, directly or indirectly. There are ways that work if you don’t mind 200 or 300 ms of extra latency over mplayer alone. But I’m doing a FPV teleoperation thing and that’s too much latency for remote control.

I found a way that sort of works. Here’s a bash script (works in Linux Mint 15, which is like Ubuntu):

#!/bin/bash
mplayer tv:// -tv device=/dev/video1:input=1:norm=NTSC -fs&
outfile=$(date +%Y-%m-%d-%H%M%S)$1.mp4
avconv -f x11grab -s 800×600 -i :0.0+112,0 -b 10M -vcodec mpeg4 $outfile

This works by running mplayer to send the live video to the screen (full screen), then running avconv at the same time to grab the video back off the display (-f x11grab) and encode it. It doesn’t add latency, but grabbing video off the display is slow – I end up with around 10 fps instead of 30.

There must be some straightforward way to “tee” /dev/video1 into two virtual devices, so both mplayer and mencoder can read them at the same time (without one of them complaining that the device is “busy”). But I haven’t found anybody who knows how. I even asked on Stack Overflow and have exactly zero responses after a day.

(If you know how, please post a comment!)


Addendum for Linux newbies (like me):

After you put the script in file “video.sh”, you have to:

chmod +x video.sh # to make it executable (just the first time), then

./video.sh # to run the script (each time you want to run it)

You’ll probably want to tweak the script, so you should know that I’m using a KWorld USB2800D USB video capture device, which puts the composite video on input=1 (the default input=0 is for S-Video) and requires you to do norm=NTSC or it’ll assume the source is PAL.

-fs makes mplayer show the video fullscreen. Since I’m doing this on my Samsung N130 netbook with a 1024×600 screen, the 4:3 video is the 800×600 pixels in the middle of the screen (starting at (1024-800)/2 = 112 pixels from the left).

Also, many thanks to Compn on the #mplayer IRC for trying really hard to help with this.


Update 2013-11-02:

I haven’t given up on this, so I’ll use this space to record progress (or non-progress).

I started a Stack Exchange thread on this.

On IRC I was told that VLC can do this. I got as far as getting it to display the video at 720×96 (yes ninety-six) resolution, with a lot of lag (the source is VGA, 640×480).  Googling about it, it seems the resolution problem is probably fixable with VLC, but the lag isn’t.  So I gave up on that.

The most promising approaches at the moment seem to be:

  1. This page about ffmpeg which gives ways to create multiple output from a single video input device – exactly what I need. But I haven’t found any way to get ffmpeg to read from input=1:norm=NTSC (as mplayer can).
  2. This thread on Stack Exchange seems to describe  ways to “tee” the video from one device into 2 (or more) other devices. One way using V4L2VD, the other using v4l2loopback. I haven’t figured out how to get either working.

Update 2013-11-03:

Pygame has the ability to read and display video streams, but ‘nrp’ (one of the developers of pygame) told me on IRC that he never implemented reading from anything other than the default input 0 (zero). He suggested that the info needed to update the pygame code to do that is here, and the source code is here. I’m not really up for doing that myself, but maybe somebody else will (I posted this bug on it, per nrp’s suggestion).

Another idea I had was to just buy a different USB video capture device, that works with the default input 0 and norm. So far I haven’t found one that does that.

But I’ve got two new leads:


Update 2013-11-03 #2:

I think I made a sort of breakthrough.

v4l2-ctl can be used to control the video4linux2 driver after the app that reads the video stream has started. So even if the app mis-configures /dev/video1, once the app is running you can configure it properly.

The magic word for me is:

v4l2-ctl -d 1 -i 1 -s ntsc

That sets /dev/video1 (-d 1) to input 1 (-i 1) and NTSC (-s ntsc).

Not only that, but I (finally) found out how to get avconv to configure video4linux2 correctly (and maybe also for ffmpeg).

For avconv, “-channel n” sets the input channel, and “-standard NTSC” sets NTSC mode.  I think the equivalents in ffmpeg are “-vc n” and “-tvstd ntsc” respectively, but I haven’t tried those yet.

But this works:

avplay -f video4linux2 -standard NTSC -channel 1 /dev/video1

Now I can try to ‘tee’ the output from /dev/video1….

  • do it…

Update 2014-06-01:

I gave up on this, but eventually got it working in Python with Windows (see this post); maybe that method will also work in Linux (I haven’t tried it).

For what it’s worth, this guy claims he has it working this way:

vlc -vvv v4l2:///dev/video1:input=1:norm=PAL-I:width=720:height=576 –input-slave=alsa://plughw:1,0 –v4l2-standard=PAL_I –sout ‘#duplicate{dst=display,dst=”transcode{vcodec=mp4v,acodec=mpga,vb=800,ab=128}: std{access=file,mux=mp4,dst=test.mp4}}’

I’m doubtful (esp. re latency), but you could try it.

OpenSCAD is great stuff! (Part 2)

[This is Part 2 of this post; click here for the first part.]

OpenSCAD is an open-source (completely free) 3D solid CAD program; it works on Windows, Linux, and Mac OS X.

It calls itself “The Programmers Solid 3D CAD Modeller”, and indeed that’s what makes it special.

Unlike any other CAD system I’ve seen, OpenSCAD is driven entirely by a program-like script. That sounds like it would be a lot harder to use than a GUI-based CAD system – but it’s not! It’s much easier to use, with a much shorter learning curve. The scripts use a C-like syntax that will be instantly familiar to anyone who’s worked even a little with C or a C-derived braces-and-semicolon language (C++, Java, C#, etc.).

In 15 minutes with OpenSCAD, I was able to do far more than I could with AutoCAD or SketchUp after several hours – with a lot less frustration. If you have any background in programming at all, you’ll find it ridiculously easy to learn and use.

OpenSCAD has a simple but effective IDE, so you can try things interactively at the keyboard – just type some commands, mash F5, and see the result instantly. Once your 3D model is rendered, you can use the IDE to zoom in and out and look at your model from any angle.

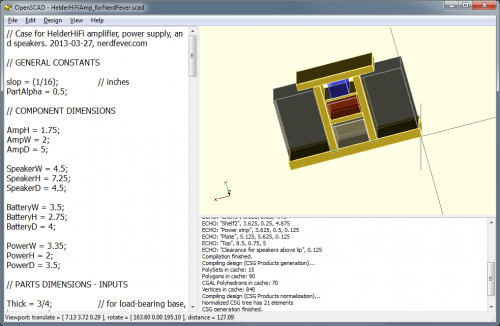
OpenSCAD showing my modeled speaker set

OpenSCAD showing my modeled speaker set

What makes OpenSCAD great for engineering drawings is it’s ability to position and size things numerically – if you want a part exactly 3.75 inches to the left of another part, just subtract 3.75 from the x-coordinate of the part, and that’s where it will be. If you want a part to be tall enough to cover 9 other parts, just get the dimensions of the other parts, add them up (in your script) and feed the result in as the height value.

That way, if you resize one part of your model, all the other parts that depend on it for their own size and position automatically get adjusted to compensate. If you want something centered with respect to some dimension, just take the dimension and divide it by 2 to get the proper position!

None of this is “magic” performed by OpenSCAD – this is stuff done by you, in your own script (program), so it’s 100% under your control.

For example:

cube([w, h, d]);

Gives you a rectangular prism with the given width, height and depth. “w”, “h”, and “d” can be literals – so cube([1,4,9]); gives you a 2001-type monolith. Or they can be program variables, which you can pass to a module and whose values you can compute.

There are commands to translate, mirror, and rotate objects (or groups of objects), and you can assign colors and transparency to them (but not textures, yet anyway). All the basic arithmetic and trigonometry functions are there to help you compute sizes, positions, and angles. And you can construct objects by any combination of adding or subtracting primitives (rectangular prisms, cylinders, spheres, and polyhedrons).

Conditionals and iteration are available with C-like “if” and “for” statements, so you can write a “real program”.

One unexpected thing is that the compiler is somewhat primitive – all variable values are computed at compile time (not “run time”); this has to be kept in mind when writing scripts, but I didn’t find it a serious problem.

The OpenSCAD website has an excellent manual (by freeware standards) that explains all this, as well as a handy “cheat sheet” for quick reference.

So far, I’ve used OpenSCAD only for this one project, and that took just a few hours – most of the time was spent tweaking the design of my speaker case. (Unlike all the other CAD programs I tried, hardly any time was spent figuring out how the program works.)

However, I quickly found a few tricks worth mentioning:

module part(name, w, h, d) {
cube ([w, h, d]);
echo (name, w, h, d);
}

This defines a module (something like a function) called “part”, which I use to define each separate part I’ll have to cut out of plywood to assemble the speaker set. Each part has a name, width, height and depth, and when the part is rendered, it prints out (via the “echo” statement) the name and dimensions, so I get a automatically-generated “cut list” of parts to make.

For example, I have this code:

module base(x,y,z) { translate([x,y,z]) { part(“Base”, BaseW, BaseH, BaseD); } }

This defines a module “base” that will create the base of the speaker case, using the dimensions in the variables BaseW, BaseH, and BaseD. The x, y, z inputs to the module give the position where the base should be.

Later in my script, I call:

base(0,0,0);

Which creates the base of the speaker set, positioned at the origin of my coordinate space. It also prints the output:

ECHO: “Base”, 14.375, 0.75, 4.75

Which gives me the dimensions I need to cut to make the base. (The print formatting abilities of the script language are minimal, but adequate for this purpose.)

Here is the first part of my final script – it gives you an idea of how I calculated the dimensions of parts:

// Case for HelderHiFi amplifier, power supply, and speakers. 2013-03-27, nerdfever.com

// GENERAL CONSTANTS

slop = (1/16); // inches
PartAlpha = 0.5;

// COMPONENT DIMENSIONS

AmpH = 1.75;
AmpW = 2;
AmpD = 5;

SpeakerW = 4.5;
SpeakerH = 7.25;
SpeakerD = 4.5;

BatteryW = 3.5;
BatteryH = 2.75;
BatteryD = 4;

PowerW = 3.35;
PowerH = 2;
PowerD = 3.5;

// PARTS DIMENSIONS – INPUTS

Thick = 3/4; // for load-bearing base, top, supports
ShelfThick = 1/4;
StripThick = 1/8;

StripLip = 1/4;

TopW = 8.5;

PlateThick = StripThick;

// PARTS DIMENSIONS – CALCULATED

BaseW = slop + SpeakerW + slop + Thick + slop + BatteryW + slop + Thick + slop + SpeakerW + slop;
BaseH = Thick;
BaseD = max(max(max(AmpD, SpeakerD), BatteryD), PowerD) – 2*StripThick;

The idea here is that I’m allowing a “slop” of 1/16th inch – this is extra space beyond what is strictly needed per the component dimensions, to allow something for clearance and imperfect cuts.

Then I have the dimensions of the parts that need to fit inside the speaker case, and then the thickness of the plywood stock (3/4, 1/4, 1/8″) I’m going to use for different parts. Finally, from those I calculate the dimensions of the base – the width of the base is the sum of all the parts it has to hold, plus two “Thick” dimensions (for the vertical pillars), and slop around each of the parts. The base depth is calculated as the maximum of all the parts it will have to support, less “2*StripThick”, subtracting for retaining strips on either side of the base, which will be used to prevent the speakers from sliding off the base while being carried.

You can download my whole script here if you want to see it – I’m certain others have made vastly more complex and impressive things with OpenSCAD, but this shows what can be done after just a few hours of work.

When I run the script with F5, I get the rendered model:

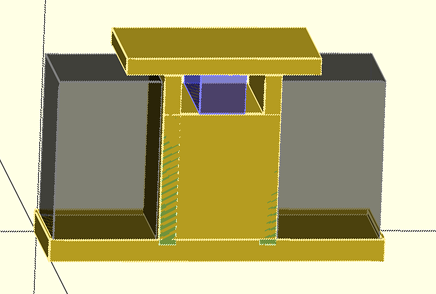
Speaker set model. Grey boxes are speakers (translucent), blue box is amplifier. (Note the top, plus 1/8" lip around the speakers, prevent speakers from falling out unless carefully lifted.)

Speaker set model. Grey boxes are speakers (translucent), blue box is amplifier. (Note the top, plus 1/8″ lip around the speakers, prevent speakers from falling out unless carefully lifted.)

And this output:

Parsing design (AST generation)…
Compiling design (CSG Tree generation)…
ECHO: “Base”, 14.375, 0.75, 4.75
ECHO: “Long strip”, 14.625, 1, 0.125
ECHO: “Short strip”, 0.125, 1, 4.75
ECHO: “Pillar (less subtraction)”, 0.75, 7.625, 5
ECHO: “Pillar remove”, 0.25, 0.125
ECHO: “Pillar remove”, 5.875, 0.125
ECHO: “Pillar (less subtraction)”, 0.75, 7.625, 5
ECHO: “Pillar remove”, 0.25, 0.125
ECHO: “Pillar remove”, 5.875, 0.125
ECHO: “Shelf1”, 3.625, 0.25, 4.75
ECHO: “Shelf2”, 3.625, 0.25, 4.875
ECHO: “Power strip”, 3.625, 0.5, 0.125
ECHO: “Plate”, 5.125, 5.625, 0.125
ECHO: “Top”, 8.5, 0.75, 5
ECHO: “Clearance for speakers above lip”, 0.125
Compilation finished.
Compiling design (CSG Products generation)…
PolySets in cache: 15
Polygons in cache: 90
CGAL Polyhedrons in cache: 0
Vertices in cache: 0
Compiling design (CSG Products normalization)…
Normalized CSG tree has 21 elements
CSG generation finished.
Total rendering time: 0 hours, 0 minutes, 0 seconds

As you can see from the last line, this simple project renders nearly instantly.

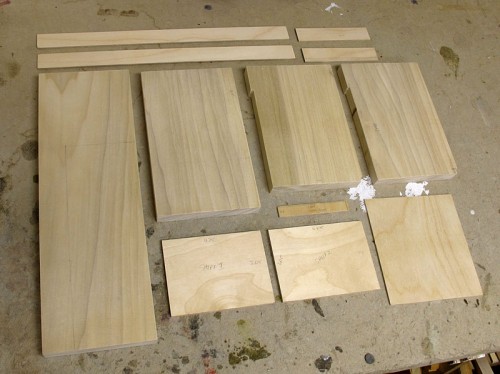
From the cut list, I was able to go to my wood shop and cut out all the parts, ready to assemble:

Speaker set parts, per the cut list

Speaker set parts, per the cut list


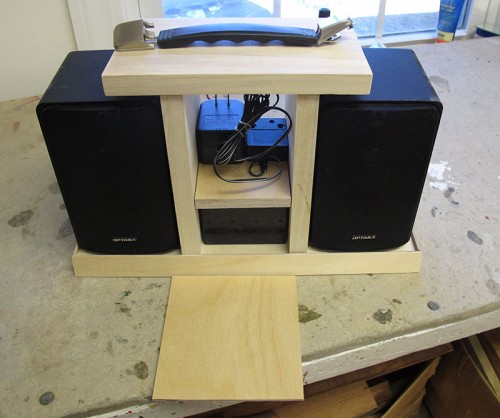
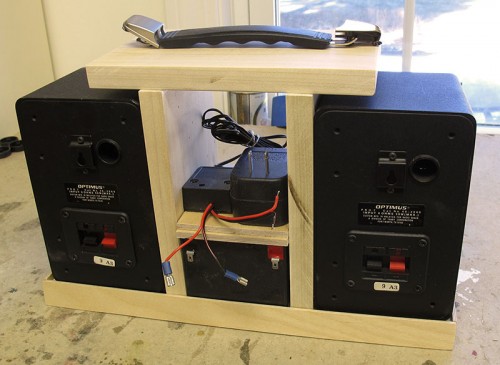
I quickly piled the pieces together to see if they really fit with the components…

Front view. (Amplifier will go on top shelf.)

Front view. (Amplifier will go on top shelf.)

Back view.

Back view.


…and they did! Perfect on the first try!


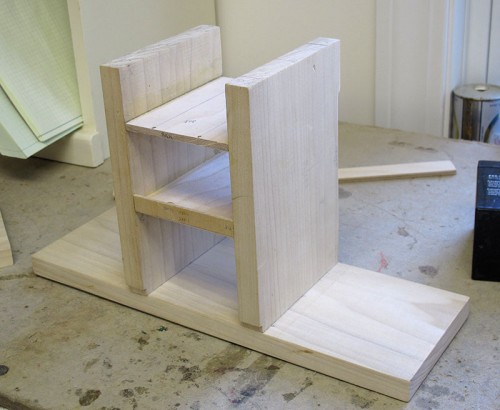
Here’s the case part way thru assembly:

Case partially assembled.

Case partially assembled.


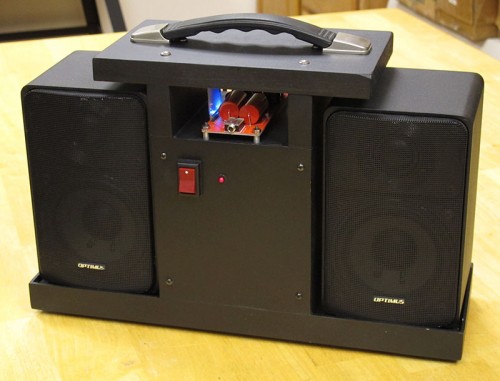
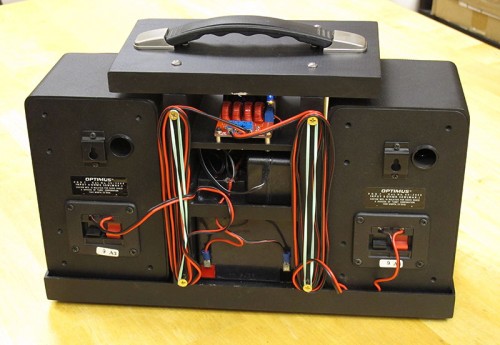
And the finished product, painted and wired up:


Front view.

Front view.

Back view.

Back view.

It sounds good, too.

OpenSCAD is great stuff! (Part 1)

It all started with a pair of Radio Shack Optimus Pro 7 bookshelf loudspeakers I picked up on eBay for a song.

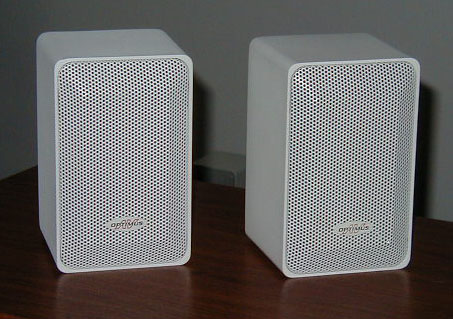
These little speakers sound fantastic for their size, and at one time you could get them new at Radio Shack really cheap – I’ve been using a pair of white Pro 7AVs (the magnetically-shielded version) since the mid-90s as my PC desktop speakers.

Pro 7AV speakers (photo courtesy of Wade's Audio and Tube)

Pro 7AV speakers (photo courtesy of Wade’s Audio and Tube)

One day I was procrastinating by surfing eBay, ran across a black pair that looked nice, put in a bid, and soon had them in my basement, waiting for a project to use them.

Then I noticed the existence of low-cost TriPath TA2020-based amplifiers like this very popular one from Lepai. These things get fantastic reviews – the TA2020 uses PWM amplification and its distortion sounds like tube (valve) amplifier distortion. And audiophiles have been paying outrageous prices for tube amplifiers ever since tubes went out of style. Yet these TA2020 amplifiers go for 20 bucks! (And, yes, I know putting “audiophile” and “outrageous prices” in the same sentence is a bit redundant, but I’m not getting into that now.)

You may have figured out by now that I just can’t resist cheap things that deliver ridiculous value – it’s a character flaw. So combine the cheap-but-great loudspeakers with the cheap-but-great amplifier, and I just had to do something with them.

I decided to make a set of portable Bluetooth speakers. I’ve bought a few different Bluetooth loudspeakers and they all sound terrible to my ears; even the way-overpriced Bose ones sound bad to me (and I’m too cheap to pay that much anyway). So I thought I’d make my own.

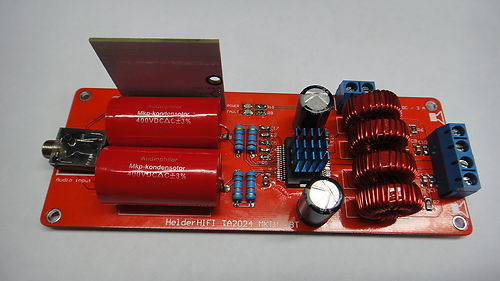
There’s a guy Arjen Helder in Shenzhen (arjenhelder_electronic on eBay) who makes very well-reviewed TA2020 amplifiers, and he has a model “TA2024 MKV Bluetooth” with the Bluetooth module already built in. So 20 pounds sterling later (“Approximately US $30.35”), I’ve got one of those and I’m ready to start.

Helder HiFi TA2024 MKV Bluetooth amplifier

Helder HiFi TA2024 MKV Bluetooth amplifier

I wanted my speaker set to be portable, so that means they need a battery, and I happened to have an old 12V 5AH AGM battery around. Since the amplifier runs on 12VDC, that seemed a good fit. And I had a spare Harbor Freight 12V charger too ($9.99; did I mention I’m cheap?), so I figured I’d use that to both charge the battery and power the amp while it’s plugged in.

12V 5AH SLA battery and $9.99 Harbor Freight charger. (Not quite to the same scale...)

12V 5AH SLA battery and $9.99 Harbor Freight charger. (Not quite to the same scale…)

(Yes, I’m going to get to OpenSCAD. Be patient!)

So now I had most of the bits and pieces, and needed to come up with a design for the speaker set. I wanted a handle (to make it more portable; the speakers and lead-acid battery are heavy) and a place to wind some extra speaker cable, so I could separate the speakers for better stereo. That meant the speakers had to be held in a way that allows removing them, yet at the same time I didn’t want them to fall out by accident while carrying the set by the handle.

So I started sketching on paper. Here’s one of the earlier sketches:

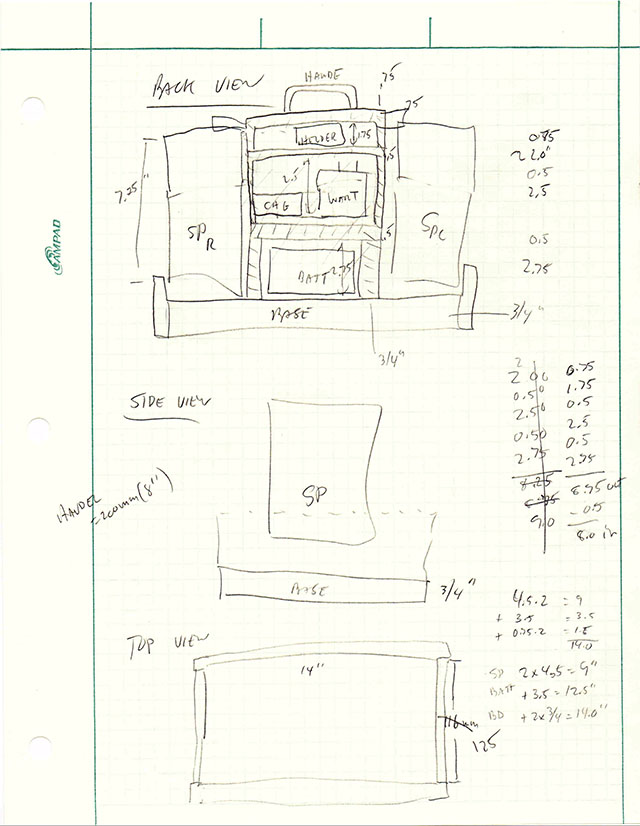
Sketch1OK, so I’m not a good artist.

But the important thing was to get the dimensions right. I wanted it to be compact, but have room for all the pieces. (BTW, I hate using inches and fractions as much as anyone, but I’m in the US and lumber here only comes in those dimensions, so I’m stuck with them.)

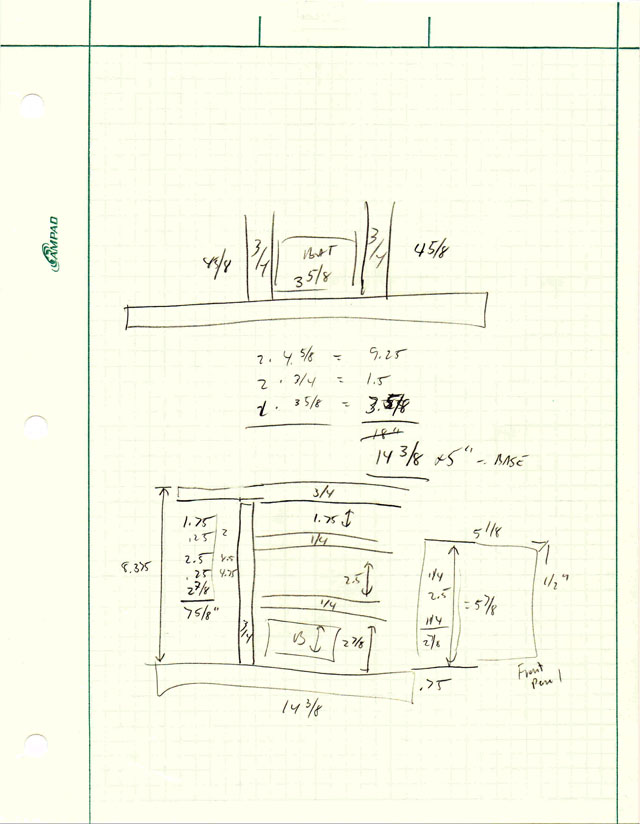
As I made each sketch, I realized there were opportunities for improvement (perfectionism is another of my character flaws), so first I’d scratch things out, then at some point I’d start a whole new sketch:

Sketch2

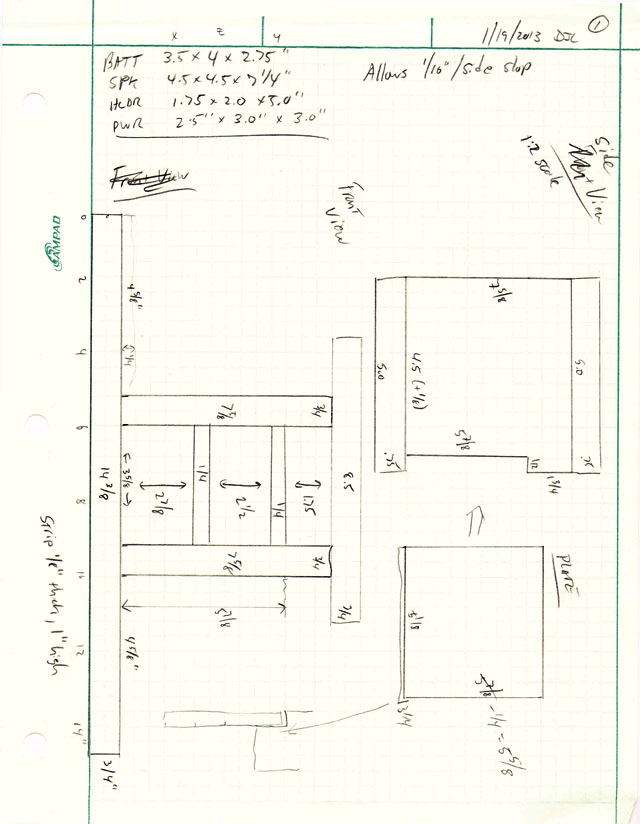
and another:

Sketch3

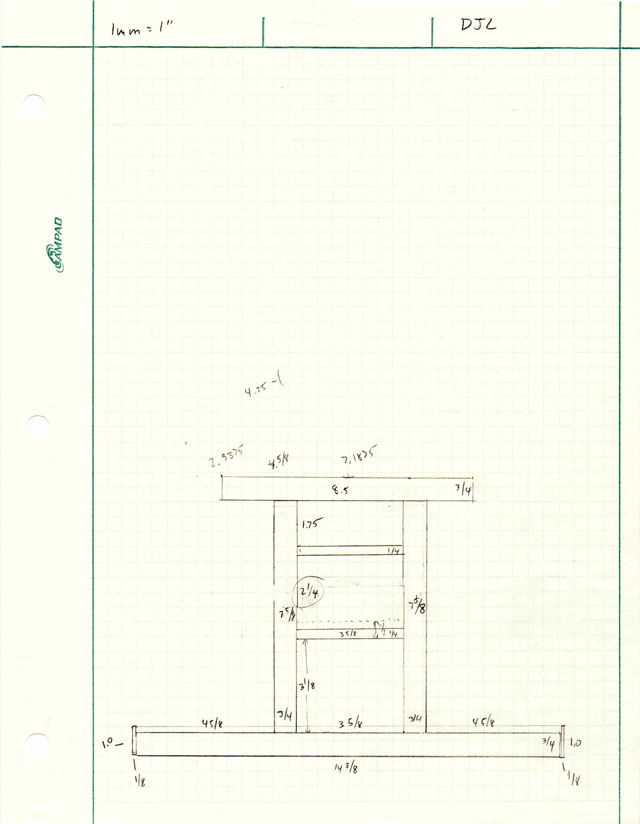
and another:

Sketch4

Etc.

This was frustrating. Any little change cascaded all across the design, and it was easy to make a mistake in calculating dimensions.

So I decided to see if I could find some simple CAD program to help. I spent some time communing with Google, and decided that SketchUp (ex-Google SketchUp, now owned by Trimble) was the way to go.

I spent a few hours learning to use it, and made moderate progress getting my design into the program:

How far I got with SketchUp

How far I got with SketchUp

However, I found it very difficult to transfer the dimensions from my paper sketches into SketchUp; there didn’t seem to be any direct way to force SketchUp to size things exactly, or to position parts at particular offsets with respect to other parts. SketchUp, although it’s far simpler than most “serious” CAD programs, still has a long learning curve, and it didn’t seem very well suited to the kind of engineering drawings I was trying to do. I could easily get things close, but couldn’t get them exact (I suppose there must be a way to do it, but I didn’t figure it out).

After trying and getting stuck for a few hours, I went looking for a better solution.

And that’s when I found OpenSCAD.

[To be continued in Part 2…]

Dropbox is still better than Google Drive

[Update 2014: This is obsolete. Google Keep solves the problem better now.]

In July I switched from an iPhone to a Galaxy Nexus running Android Jellybean.

I was fed up with Apple’s sue-happy arrogance and with being locked to AT&T (I travel; AT&T’s international roaming rates are highway robbery).

Plus Jellybean just looked like a more advanced platform. Google’s price of $350 unlocked and usable anywhere in the world was a great deal. When Apple got an injunction against the Galaxy Nexus, I pulled the trigger and snapped one up before it got yanked off the market.

Back in 2009 I went thru a painful transition from the Palm Treo to the iPhone. One of the big issues then was getting my memos onto the iPhone in a form that was:

  • Synchronized with the PC (so I can edit on either device)
  • Reasonably secure (encrypted sync)
  • Editable offline (on either the PC or the phone)

My solution was to store memos in the “notes” field of address book entries. This synced securely with Google Contacts and I could edit my memos offline. It worked great.

Unfortunately the Android version of Google Contacts has a limitation on the size of the “notes” field. Neither the iPhone or the web version of Google Contacts have this problem, but I had plenty of memos that were too long to read on Android.

So I decided to move the memos into Google Drive (ex-Google Docs) files, thinking I could edit those on the phone or PC.

It turns out you can’t edit Google Drive documents when you’re offline. Also, the Google editor is complex enough to take an annoyingly long time to start on the phone (when I just want to check my shopping list).

But Dropbox works great:

  • Store the memos in Dropbox as plain text.
  • Put a shortcut to the memos folder on your “links” toolbar in Windows
  • Put the Dropbox widget (direct link to the memos folder) in the Android dock
  • Mark the memo files with a star (“favorite” them), so Dropbox will cache them locally in the phone for offline access.

That’s it. You can edit either on the PC or phone, and it syncs securely. It’s even smart enough to create a “conflict” copy if you make conflicting changes on the PC and phone.

I’m disappointed with Google Drive – this should be easy. And I don’t see why they put the size limit on Android address book notes (when there isn’t one on the PC or iPhone).

I’ll say this – the transition to Android was easy; nothing like the nightmare moving to the iPhone.

I think Apple has started a long, slow descent into irrelevance. They must think so too – winners compete, losers sue.

Questions are more valuable than answers

…at least if you’re Google.

The interesting site Terms of Service; Didn’t Read gives Google a thumbs-down because “Google can use your content for all their existing and future services”.

I don’t think a thumbs-down is really fair here – I mean, that’s the whole point of Google.

Google is a service that gives out free answers in exchange for valuable questions.

Answers are worthless to Google (though not to you) because Google already knows those answers. But it doesn’t know your questions. So the questions are valuable (to Google, not to you). Because Google learns something from every question.

When you start typing a search into Google and it suggests searches based on what other people have searched for, that’s using your private information (your search history) to help other people. They’re not giving away any of your personal information (nobody but Google knows what you searched for or when), but they are using your information.

Google gets lots of useful information from the questions that people ask it. It uses that information to offer valuable services (like search suggestions) to other people (and to you), that they make money from (mostly by selling advertising).

That’s not a bad thing. It’s the only way to do many of the amazing, useful, and free things that Google does. I’m perfectly fine with it, but you have to more-or-less trust Google to stick to their promise to keep your private info private.

I think Google does a lot more of this than most people suspect.

When you’re driving and using Google Map to navigate, you’re getting free maps and directions. But Google is getting real-time data from you about how much traffic is on that road, and how fast it’s moving.

When you search for information on flu symptoms, Google learns something about flu trends in your area.

Sometimes I ask Google a question using voice recognition and it doesn’t understand. After a couple of tries, I type in the query.  I’ve just taught Google what I was saying – next time it’s much more likely to understand.

When you use GMail, Google learns about patterns of world commerce and communication, who is connected to who, who is awake at what time of day, etc. Even if it doesn’t read the contents of the mail.

When you search for a product, Google learns about demand in that market, by location and time of day and demographics (it knows a lot about you and your other interests).

Google learns from our questions – answers are the price Google pays for them.

Email migration from Eudora (or Thunderbird) to GMail

Update November 17 2012: 

I started this post back on July 20 – four months ago – and have only finished the migration now. That’s because I found a lot of unexpected problems along the way.

The rest of this post is my new, improved, and corrected step-by-step guide on how to migrate email from Eudora (up to version 7) or Thunderbird to GMail, based on hard-won experience.

BACKGROUND

I’ve been using Eudora since 1995 (17 years). Before that I used Unix mail (Sun; early 1990s), CompuServe (back to 1981), and something called “The Source” (1979; I was ‘TCA818’). Disk space was expensive back then so I didn’t save a lot of email.

But since 1995 I’ve kept everything – disk drives got bigger faster than my mail archive. So I had about 14 GBytes of email in Eudora.

Eudora has been abandoned by Qualcomm since 2006 and is getting old; there’s a new open source version based on Thunderbird (“Eudora OSE”), which sucks.

As our company grows the job of administering Eudora users (plus myself) was getting too big for me, so I decided to outsource it to Google Apps for Business. Which means GMail, and migrating the old email.

ABBREVIATIONS

In the following, I’ll use these abbreviations:

  • E7 – Eudora 7 (or any earlier version of Eudora)
  • OSE – Eudora Open Source Edition (used only for migration)
  • Tbird – Mozilla Thunderbird
  • Outlook – Microsoft Outlook 2003 or later
  • OE – Outlook Express
THINGS THAT WON’T WORK

To save you time, here are some things that won’t work:

  1. Syncing E7 to GMail using IMAP
  2. Converting E7 to E-OSE, then sync E-OSE with GMail using IMAP
  3. Converting E7 to E-OSE, then sync Tbird with GMail using IMAP
  4. Converting E7 to Outlook Express, that to Outlook, then Outlook to GMail
  5. IMAPSize
  6. Importing E7 data with Outlook, then sycning to GMail
  7. Importing Tbird data with Outlook, then sycning to GMail
  8. Importing E7 data with Thunderbird
  9. Syncing Outlook with GMail via IMAP (use this instead; it works)

Trust me, don’t bother.

If you really care or don’t believe me, in the Appendix at the very end of this posting I’ve put some of my notes on why some of those don’t work.

(I haven’t the patience to describe all the problems…comments in the Python files give some more details.)

STUFF YOU WILL NEED

To do the migration, you’ll need the following:

These are only for the migration. Once it’s done you can throw away all of them.
Read the rest of this entry »