Last weekend I went on one of the New England Aquarium‘s whale watch tours.
About 6 miles northwest of Provincetown MA, I captured this video of a humpback whale breaching. Just dumb luck.
Pretty impressive.

Last weekend I went on one of the New England Aquarium‘s whale watch tours.
About 6 miles northwest of Provincetown MA, I captured this video of a humpback whale breaching. Just dumb luck.
Pretty impressive.
For more than 100 years, camera and lens makers have been doing signal processing in the analog domain with ever more carefully and cleverly shaped glass – to bend and synchronize light rays.
Now the equivalent thing, and much more, can be done in software, rendering most of that effort moot.
Modern smartphones have the computational abilities of supercomputers, and use them to produce images that rival those from expensive, heavy, bulky cameras – using tiny cheap lenses and sensors.
See, for example:
and
https://research.googleblog.com/2017/11/fused-video-stabilization-on-pixel-2.html
Traditional camera and lens makers need to get on the DSP wagon or be left behind. Soon – time is running out! You don’t want to be the next Kodak.
(Canon, Nikon, Pentax, Olympus, etc…this means you.)
From Casper WY. It was amazing; I’d never seen a total eclipse before. A partial eclipse doesn’t compare at all.
Here’s about 5 minutes around totality, compressed into 5 seconds (64x real time, exactly):
If you watch the clouds, you can see the eclipse shadow come and go.
Also notable is the city traffic (in the background).
Sometimes I get an idea in my head and just can’t get it out.
Modern digital cameras often have tiny sensors compared to 35mm film.
High-quality 1970s “prime” 35mm lenses had a reputation for being very sharp.
When one of those lenses is mounted on a small-sensor camera, the sensor covers only a tiny central region of the 35mm-sized image formed by the lens – essentially the sensor is cropping from the middle of the image, resulting in a telephoto effect.
This gives rise to the “crop factor” of small sensor cameras – at a given focal length, the field of view of the small sensor is much smaller (more “zoomed in”) than on the original 35mm film the lens was designed for.
What, I wondered, would images from a high-quality 1970s prime 35mm lens mounted on a modern small-sensor camera look like? Especially, could I get super-telephoto effects by mounting lenses that were considered long (telephoto) by 35mm standards, multiplied the “crop factor”?
I had to try it.
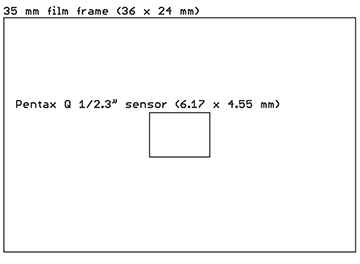
35mm film frame vs Pentax Q sensor
Above is a diagram showing the relative sizes of a 35mm film frame compared to the 1/2.3″ sensor in the Pentax Q.
The Q has the smallest sensor of any interchangeable lens camera I know of. While this may make it – ahem – less than ideal for general photography purposes (altho to be fair the latest versions of the Q have moved to a larger 1/1.7″ sensor, a huge improvement), that little 6.17 x 4.55 mm sensor does have an immense “crop factor” of 5.6x (comparing effective field of view at the same focal length – the number isn’t exact because the Q’s sensor has a 4:3 aspect ratio, while 35mm film is 3:2).
Off-topic, but other points in favor of the Q are the tiny flange focal distance of 9.2mm – it can mount just about any lens ever made – and Pentax’s excellent UI. I’m not sure there’s a mass market for a camera like this, but it sure can do some things that no other camera can.
So, while a “normal” 50mm lens on a 35mm camera has a 39.6 degree field of view (horizontal), the same lens on the Q sees only 7.1 degrees.
And – here’s the neat thing – a “telephoto” 200mm lens on a 35mm camera sees 10.3 degrees – but on the Q, only 1.8 degrees. That’s the equivalent of an immense 1120 mm lens in 35mm format. And a super-telephoto 500 mm lens sees just 0.71 degrees on the Q – equivalent to 2800 mm on 35mm.
So, I tried it. I got some Minolta MD/MC type prime (non-zoom) lenses on eBay, mainly because they have an excellent reputation and are a bit cheaper than other brands (because they don’t fit many modern cameras), and an adapter for the Q (also on eBay – remember I said the Q can mount almost anything?).
Here’s what I ended up with:
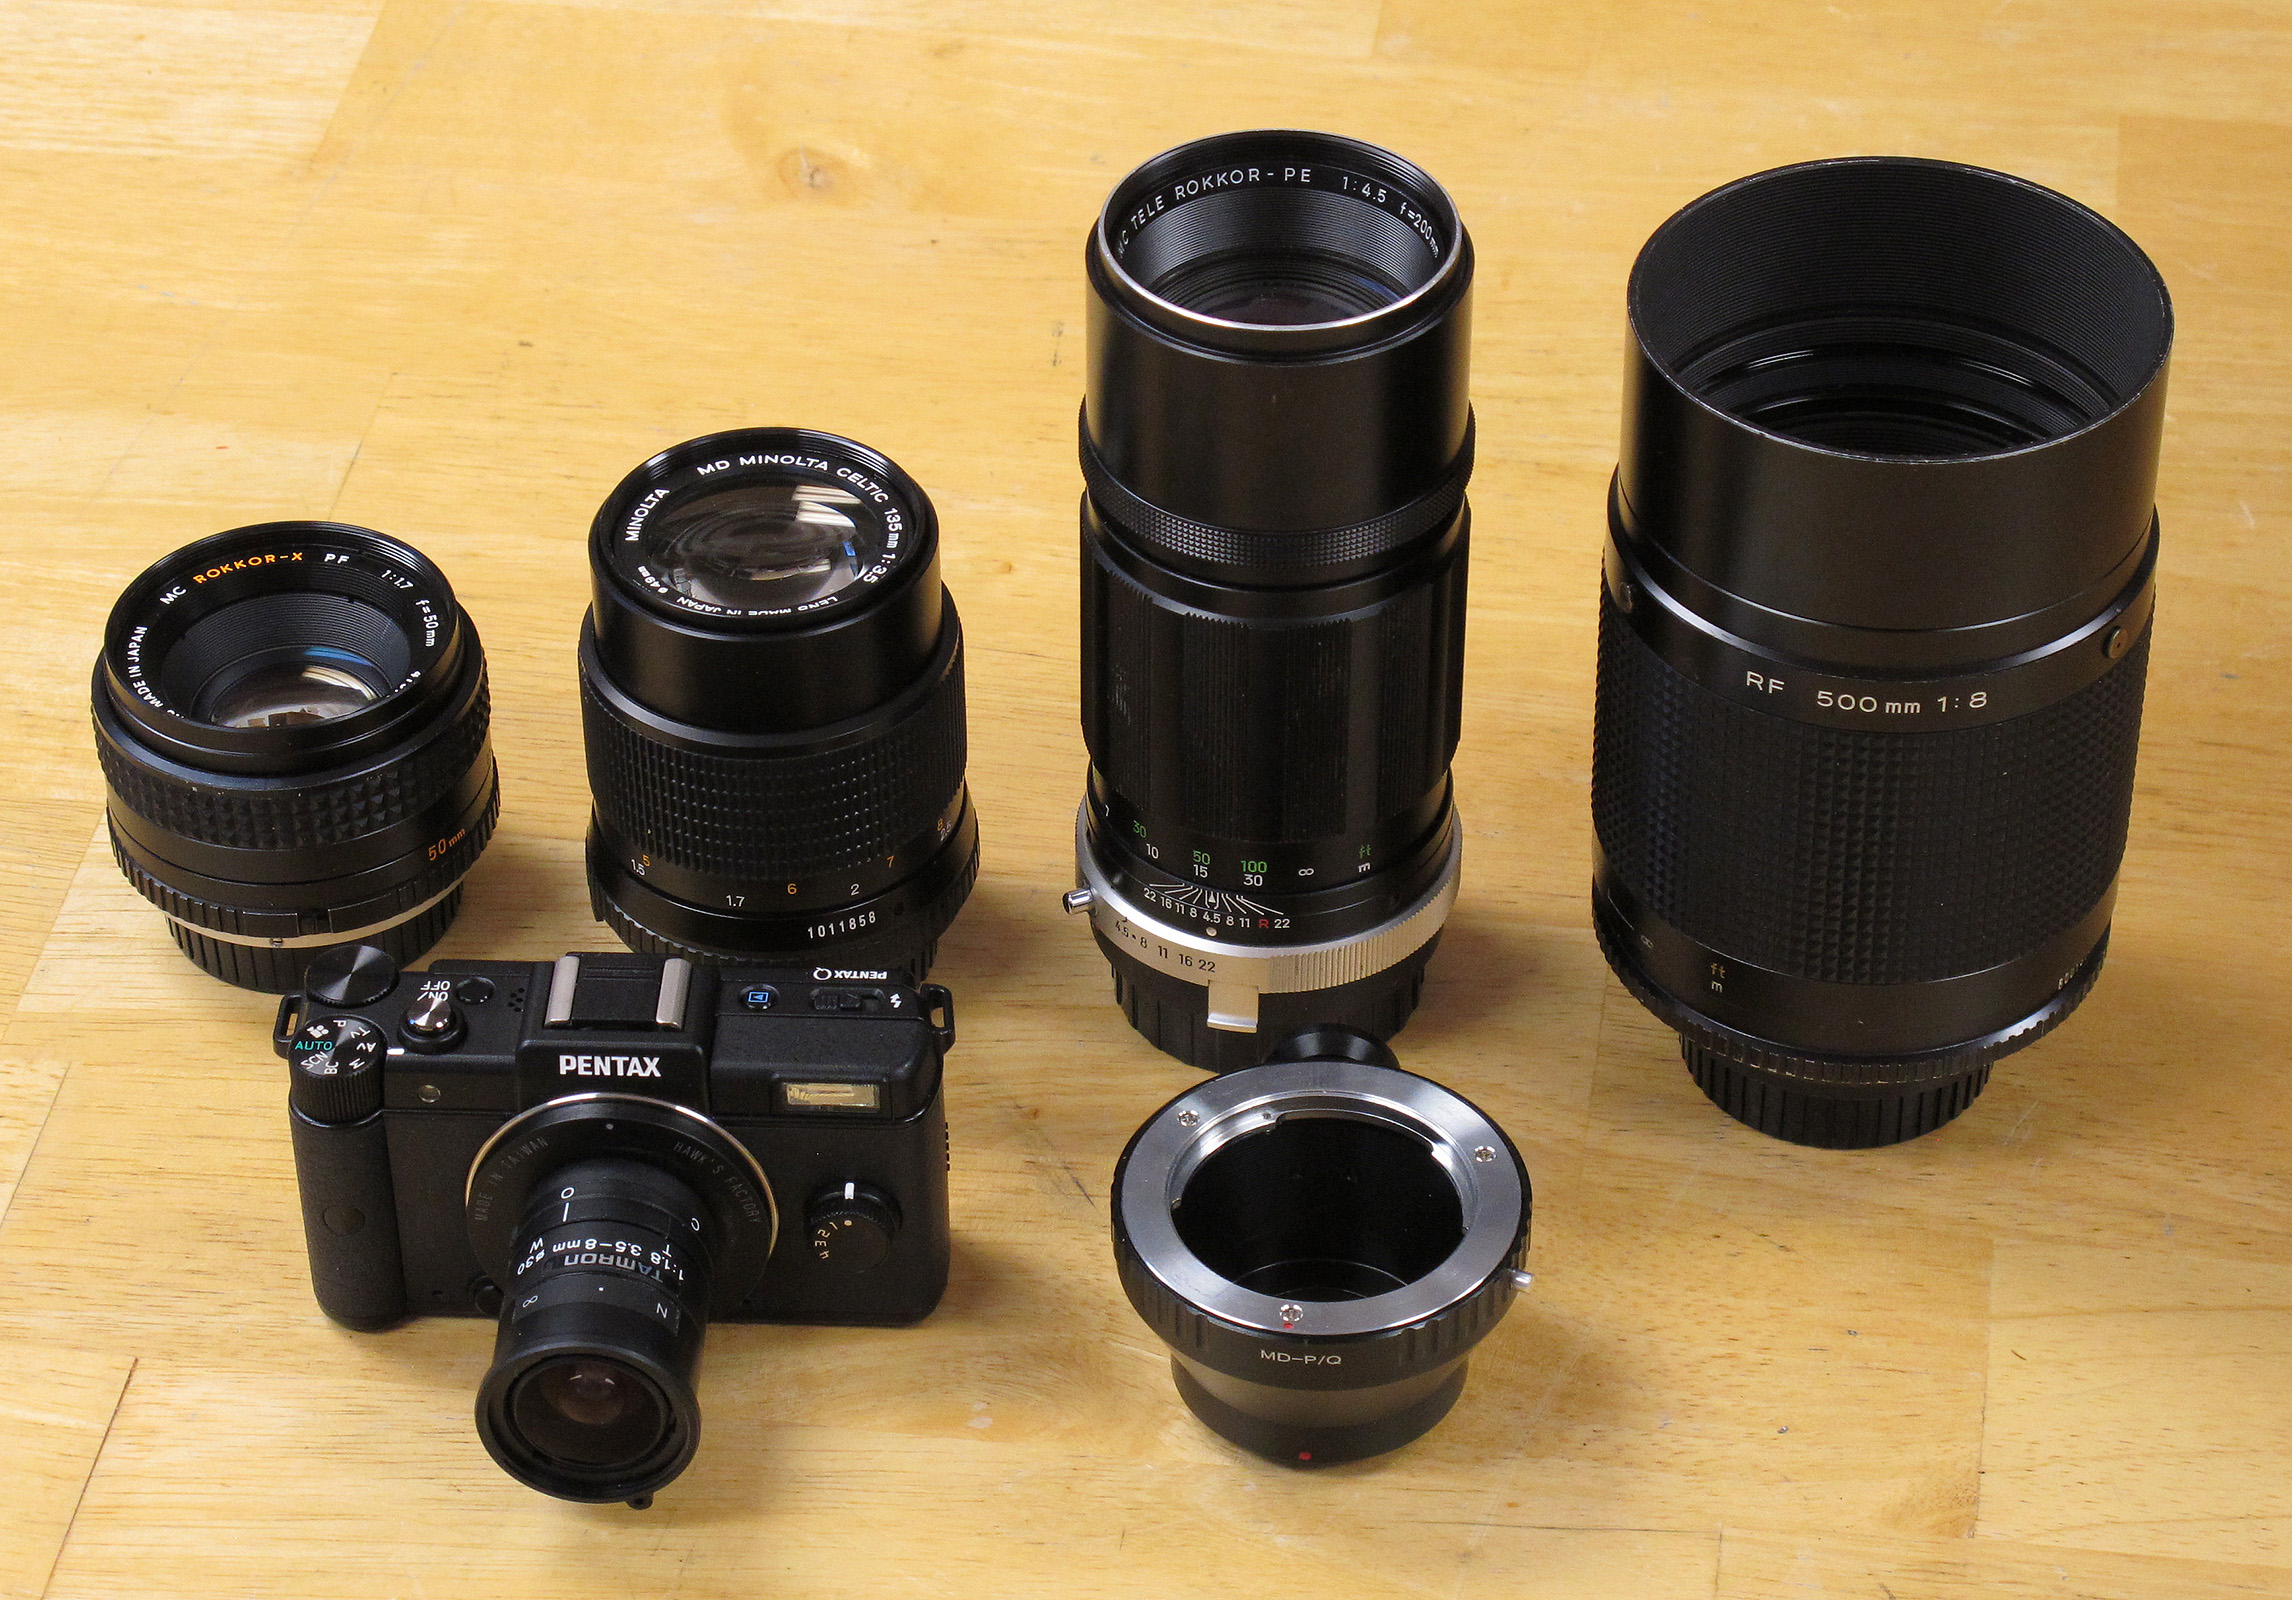
Lenses tested
Left to right:
From what I can tell online, these are all highly-regarded lenses. The “Celtic” line was Minolta’s cheaper brand, but it seems the economy came from using cheaper materials in the mount, etc. – supposedly it is optically identical the to more expensive “Rokkor” line. And of course, these are all primes – not zooms. Even today primes are generally sharper than zooms; this was even more true in the 1970s before improved manufacturing and computerized optical design.
In the second row you see the Pentax Q with a Tamron 3.5-8mm zoom f/1.8 lens in CS mount, via a “Hawk’s Factory” CS mount adapter (I told you the Q can mount most anything…), and the Minolta MD-to-Pentax Q adapter (just a hunk of metal – no glass).
Continue reading
On July 7 I shot some video with the Nikon J1 of the joint CMASS/MMMSC launch at the Tuckahoe Turf Farm in South Berwick, ME.
After my generally scathing review of the camera (more for missed opportunity than anything else), I figured I’d give it a chance to show what it can do with high-speed photography – specifically, I wanted to try the 10 Mpixel 60 frames/second mode as well as the 400 and 1200 fps high-speed video modes.
Here is the result:
I put it together in Sony Vegas. The blurry clips were shot at 400 frames/second (240×640 pixels). The blurrier ones are at 1200 frames/second (120×320 pixels). The video is at 30 fps, giving 1/13.3x and 1/40x speed. This video shows the full resolution output by the camera.
(To be pedantic, playback is at 29.97003 Hz (that’s 30000/1001); from what I saw in Sony Vegas, the Nikon actually records at 399.6004 and 1198.8012 fps – which makes an odd sort of sense if you know NTSC.)
As you can see, all the video is lousy. It’s poorly exposed (despite some fixing in Vegas), heavily overcompressed (in-camera) and oversharpened (again, in-camera). The 1200 fps mode is worse than the already bad 400 fps mode. You can’t control it. I don’t blame Nikon too much – the high-speed Casio cameras seem to have similar problems. On the plus side, most of the video was shot at a shutter speed of 1/5000 second, which is neat to do. A couple clips were at 1/10,000th (!).
The video is good enough for some technical purposes, but it’s not a joy to look at.
Finally, you’ll note that none of the clips are at that fantastic, promised, 10 Mpixel resolution (60 Hz). It turns out that although the Nikon J1 will record stills that fast (for 1/2 second), you can’t control the shutter speed while it’s doing it. I didn’t know that until I got there and tried it. The shutter speed it picked (on a reasonably bright day) was so slow that each frame had lots of motion blur in it. So I didn’t bother. Just another needless firmware-based disappointment from the Nikon J1.
I’ve put the camera and lenses up for sale on eBay. Such a shame, Nikon. Oh well – I’m getting excited about the rumors of the new Canon mirrorless ILC system; maybe they’ll do better.
The Nikon J1 is unique and wonderful and frustrating and stupid. All at once. It’s the bastard child of a brilliant engineer and a retarded UI designer. It’s the best digicam ever built for using classic and exotic lenses, yet is deliberately crippled when you mount them. It’s the only digicam on the market that can do 60 frames/second at 10 MPixel resolution, yet it has only enough buffer to do it for half a second. And the user interface seems designed to deliberately frustrate.
It’s conflicted enough to make my head want to explode.
I’m just going to to talk about the J1 because that’s what I have. It’s sister camera the V1 is (even) more expensive and has an EVF and a higher resolution LCD screen but seems to be otherwise identical. So I assume it’s the same in all the things that delight and enrage.
")
Nikon J1 in candy apple red (credit: Nikon)
Nikon has taken a lot of heat for their choice of a 1″ sensor for the CX format (Nikon’s name for their 1″ sensor size and mount); most reviewers think it’s too small.
I strongly disagree. I think it was a brilliant choice. Look at this table of sensor sizes:
| Sensor | Area (mm^2) | Stops |
|---|---|---|
| Pentax 645 (medium format) | 1452 | 3.6 |
| 35mm (“full frame”) | 864 | 2.9 |
| APS-C (Canon) | 329 | 1.5 |
| 4/3 | 225 | 1.0 |
| Nikon CX | 116 | 0.0 |
| 1/1.7″ (Canon G12) | 43 | -1.4 |
| 1/2.3″ (Pentax Q) | 28 | -2.0 |
All else being equal, light sensitivity is proportional to the area of the sensor. There’s a big gap between sensor sizes of compact cameras (1/1.7″ and below) and “DSLR” sensors (4/3″ and bigger). The CX sensor size is smack in the middle. It allows lenses and cameras much smaller, lighter, and cheaper than do APS-C or larger formats, but with a vast image quality improvement over compact sensor cameras – a full 2 stops better than the (tiny sensor) Pentax Q.

Camera size is really important – if the camera is too bulky to take with you, you’re not going to get any pictures at all. Yet we want quality images, so we have to compromise.
When image quality is all-important, there are plenty of DSLRs on the market for that. And if size is all that matters, there are plenty of cameras the size of a deck of cards (as well as mobile phones with cameras). But the Nikon 1 offers a unique compromise.
Unfortunately Nikon didn’t exploit this very well when designing the (four) lenses available in CX format – they’re hardly any smaller than Micro 4/3 lenses. But that’s not the fault of the sensor choice. And lens design is far from Nikon’s worst mistake here.
The 1″ sensor format is also a good match for the image circle produced by many classic cine and video lenses. Many really interesting lenses meant for 16mm cinema film, or for broadcast television sensors are available on eBay. And these lenses can be easily adapted to the CX mount, while still focusing to infinity, because the CX mount has the smallest flange focal distance of any digicam on the market (excepting the Pentax Q). At just 17.0 mm, any lens designed for a longer flange distance can be easily adapted: C-mount film and video lenses, the Fuji X mount lenses (X-Pro1; 17.7 mm), Sony E mount (NEX; 18.0 mm), Micro 4/3 (19.3 mm), Samsung NX (25.5 mm), RED ONE (27.3 mm), Leica M (27.8 mm), M39 (Leica screwmount; 28.8 mm), Contax G (38.7 mm), Canon FD and FL, Minolta SR, Canon EF-S and EF, Minolta/Sony A mount, M42, and Nikon F mount – just to name some of the more popular ones.
The ability to use all these different lenses is unique to the Nikon 1 (again, the Pentax Q excepted). But did Nikon make the J1/V1 an attractive platform for these lenses? No, just the opposite. The firmware turns off all modes except full manual when any manual lens is mounted. Even the light meter is disabled. Worse, when any manual lens is mounted, the “focus assist” mode – where the central part of the image is magnified to make critical manual focusing possible – is disabled. Yet it is precisely these manual-focus lenses that need this function!
Think about that. Some Nikon firmware engineer wrote code specifically to turn off the focus assist and light meter that were already there.
They’re selling a camera that can mount more classic and exotic lenses than any other in the world, but they deliberately spent effort to make it difficult to use those lenses. And this wasn’t done to “protect” some other, more expensive, camera that has that feature – they don’t offer one. WTF, Nikon? Are you trying to make this camera fail?
But let’s go back to the positives. The camera has what I think is the only phase-detect focus system on a mirrorless camera on the market; this lets it focus fast, even during video.
Nikon also made a brilliant choice in their sensor supplier – Aptina. The Aptina sensor has super high speed readout, which makes possible a fast all-electronic shutter with no moving parts. And that enables features no other camera on the market can touch:

CMASS launch, Amesbury MA, 2010-11-21
Or, Sony Vegas 101
Over the last few weeks a lot of my spare time has been going into learning how to edit videos – mostly of rocket launches and tests. Video is a great medium for capturing and carefully reviewing fast-moving objects – a standard (NTSC) camcorder captures 60 fields (half-frames, sort of) each second, which gives you a lot of time resolution to see what is going on.
For the last dozen years or so, ever since video editing became reasonably practical on a PC, I’ve periodically attempted to learn how to edit video, but it always seemed impossibly complex. This was despite the fact that I have a pretty good technical background in video – I sat on the the committee that developed the H.264 standard. (Hi Gary, Hi Thomas. I don’t miss your meetings at all.)
But I’ve finally managed it, and it turned out to be much less bad than it seemed (as usual). I’ll try to pass along the key tricks to getting it working.
Caveat: My focus has been on editing digital video from a consumer-type HD camcorder (a Canon HF100), for ultimate viewing on a computer (a Windows box). So I’m assuming you have already copied the .MTS files of your video clips from the SD card and have them to start with.
I’ll start with the Executive Summary (applicable to rocketry-type videos), then explain:
- Camcorder setup (Canon HF100 or similar):
- Use a gun sight as a viewfinder
- Shortest possible shutter speed (1/2000 second is good)
- Manually focus at infinity (turn off autofocus)
- Turn on image stabilization
- Set highest possible bit rate
- Record at 60i
- Get far away (> 100′)
- Video editing – use Sony Vegas
- Project settings
- 1920×1080
- 59.94 frames/second
- Progressive scan
- Deinterlace by interpolation
- 32-bit floating point (video levels)
- UNCHECK “Adjust source media”
- Preview rendering quality: Set to Good (auto) or Best
- Anything less than Good won’t de-interlace (on preview)
- Add Sony Color Corrector
- Gain = ((17+255)/255) = 1.06666667
- Offset = -17
- Options>GridSpacing>Frames
- Options>Quantize to Frames
- Output: Render As…
- Audio: Default stereo at 44.1 kHz
- MainConcepts AVCHD (H.264):
- 1920×1080 (do not resample)
- Progressive scan
- Best
- Main profile
- 2-pass VBR (for quality)
- Use CPU only (only if you get errors with the GPU)
- 4 Mbps minimum; 10 to 14 Mbps is better
ABOUT VIDEO
Just like Thomas Edison’s motion picture film, video is a series of still pictures that are captured and shown in quick succession, to create the illusion of smooth motion. When you’re going to carefully analyze an event after the fact, it can be really helpful to look at those still pictures one at a time, or in slow-motion. You can easily measure the duration and timing of events by counting frames (pictures), because the frames are taken at fixed intervals of time.
In NTSC countries (USA, Canada, Japan), the standard video format is 30 frames (pictures)/second, in the rest of the world it’s 25 frames/second (PAL and SECAM standards). Since I’m in the USA I’m going to use the 30 frames/second number (adjust accordingly if that doesn’t fit where you live).
So, for example, if frame 30 shows an event starting, and frame 36 shows it ending, you know the event was 6 frame intervals long. That’s 6/30ths of a second (0.2 seconds).
Only…it’s not really 30 frames/second, it’s actually (30 * 1000/1001) frames/second, which is a tiny bit more than 29.97 frames/second. The reason for that is related to the transition from black-and-white to color broadcasting in the 1950s, the details of which are irrelevant today. Just accept it – when people say “30 Hz” in video, they mean 30 * 1000/1001 Hz. (They also mean that if they say “29.97 Hz”, which is a lot closer to the exact value, but not quite there.)
Sometimes you’ll hear about “progressive” video, often abbreviated to “p” as in “720p” and “1080p”. Progressive video is what you’d expect video to be – a simple series of still pictures captured and shown one after another, like frames of a movie film.
Other times you’ll hear about “interlaced” video (as in “1080i”). That…I’ll get to.
VIDEO CAPTURE WITH THE CAMCORDER
I’ve been using a Canon HF100 consumer-level HD camcorder. It’s pretty good. My only complaints are that it has a mild rolling shutter problem (not nearly as bad as my DSLR’s video mode), and a clunky UI for manual control. The newer models are probably better.
Viewfinder – use a gun sight
The biggest problem I’ve had with it is tracking fast-moving rockets with the non-existent viewfinder. I don’t count the LCD screen as a viewfinder – because it’s 4 inches from your nose, your eyes can’t focus on the screen and the distant rocket at the same time. And if you look at the LCD screen, then the moment the rocket (or whatever) goes off the screen, you have no idea what direction to go to find it. This is a serious problem when you’re zoomed in a long way, as your field of view is small.
After trying several alternatives (“sports finders”, cardboard tubes, optics), the best solution was to attach a gun sight to the camcorder. It has no magnification, just projects a target into your field of view. It has little set-screws for adjusting it, so you tweak these until the target points at the exact middle of the picture when the camera is zoomed in all the way. That way, as long as you keep the target on what you’re trying to shoot, it’ll be in the picture. The one I used cost about $45; I attached it with cable ties, a block of wood, some Blu-tack (under the wood), and a strip of scrap metal.

Canon HF100 camcorder with gun sight viewfinder. The masking tape is to prevent my face from hitting the “record” button.
Setting up the camcorder
The camcorder has dozens of things you can set. These are the ones that matter for videos of fast-moving things like rockets:
Shutter speed – set to 1/2000 second (or whatever is the fastest it’ll go)
The less time the shutter is open, the less motion blur you’ll get in each picture. As long as you’re shooting in daylight, there will still be enough light – the camera will open up the aperture and/or crank up the gain to compensate. Don’t set the shutter to “auto”; it’ll be much too slow to freeze fast motion and you’ll get blur. (“Auto” is fine for videos of your kids.)
Use manual focus
Continue reading
or,
How I Learned to Stop Worrying and Love … Dust
This is my NEMROC presentation from 2007; about my trip to the Black Rock Desert (Nevada) in September 2007 for the XPRS rocket launch.
Two friends and I (plus the son of one of my friends) drove from Boston to Black Rock in 51 hours, in my 20 year old RV.

The Black Rock Desert is simply … otherworldly. I love it, but it’s not to everyone’s taste.

There are over 120 slides (mostly pictures) in the PowerPoint file – the images in this post are just a sample.
I’m quite happy with the way most of the photos came out; particularly the ones taken at night. The Black Rock has really dark night skies – the Milky Way can easily be seen most nights, and came out well in the photos.
The last evening we had a night launch with lights mounted on the rockets, as you can see here.

Night launch
I hope to go again the the fall of 2009; if you’re a New England rocketeer and are interested in coming along (and splitting the gas cost – the RV gets 7 mpg), leave a comment.
Click on the link below to download the full set of PowerPoint slides (15 MBytes).


This is my presentation for NARCON 2010 (was NEMROC 2008 … see below), summarizing my efforts over the last three years since 2006 toward building a model rocket that won’t get lost.
The idea is that it carries a GPS and a steerable parachute, so it steers itself back to the launch pad on the way down.
An introduction to the project is in the PowerPoint presentation below. Fair warning: It’s 60 Mbytes.
Update January 2010: I’ve posted all the hardware design and source code for the “Rev 3” hardware on this site. The main index to the series of posts is here.
Update March 2010: I’ve replaced the presentation with a slightly updated version that I presented at NARCON 2010. It discusses a little about the “Rev 4” hardware, based on the 32-bit PIC32 MCU, toward the end. Download all 3 files (and put them in the same folder) if you want the Google Earth links to work.
2010-03 NARCON Presentation.ppt (PowerPoint file)
1004_f2_pressure.kml (Google Earth .KML file, flight of 2008-10-04)
1101f2_pressure.kml (Google Earth .KML file, flight of 2008-11-01)
If PowerPoint is an issue, here’s a PDF version of the slides (15 MB):
